Saturday, July 23, 2011

Cheese and Parsley Stuffed Peppers


I do not like meat. However, every other member in my family does. Sometimes they even feel sorry to watch me leaving the dinner table after enjoying only some salad and cheese. So last Saturday, just before starting his family barbecue party, my father stuffed these hatch and piquillo peppers (right from his garden) with feta, garlic and parsley to make everyone around the table enjoy their lunch. He grilled them on a special kind of domed metal griddle placed on fıre, known as saj. Quick, easy and lovable. 


All you need is:
Fresh piquillo and hatch peppers
Feta
Parsley
Garlic

All you need to do is:
Chop the tops off the peppers, and remove any remaining seeds inside. Mix feta with one or two cloves of minced garlic. Feta is optional, any other kind would serve in the peppers. Stuff the peppers with the cheese and garlic mixture. Top them with some parsley. Grill them until the peppers are soft and browned.

Tuesday, July 12, 2011

Mulberries, Fingerpaint and Hand of Fatima


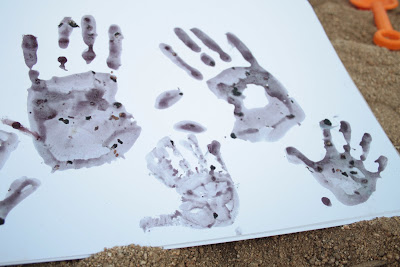
I told you about the mulberry trees in my parents' garden. It's great comfort to play with Milou in the shade they cast. So, grandpa, daddy and uncle have together built a classic sandbox under one of them for Milou in which she plays for hours while the fully ripe mulberries fall on the sand constantly during the day. Well, after such a few days it wasn't difficult to notice how much Milou loves squeezing fruit particularly red ones so the idea popped into daddy's head: Fingerpainting with squeezed mulberries! I fetched his pile of heavy paper and there we were all ready for lots of fun! I think all children love the ooey-gooey feeling as the paint oozes through their fingers and along their hands and arms while they fingerpaint and so did Milou. She was laughing while we were squeezing the mulberries. 


The first shapes to appear on the paper were the imprints of our hands with fingers spread apart, as expected! They looked like hand of Fatima which is kind of popular superstitious defense against evil eye since it represents blessings, power and strength. They reminded me of the palm-shaped amulets painted in red on the walls of some North African dessert houses for protection. Surprisingly enough, when my mom saw our paintings set aside to dry, she shared with us her very early childhood memories of the houses in her village in her hometown. She told us that elderly women in the village used to soak their hands in some red-brown mud and imprint their hands on the wall next to the front door. The idea was probably to ward off the evil eye. Whatever the reason was, she clearly remembers the bright red-brown colour of the hands on the white walls. Actually, her story sounded quite familiar when we thought of how 'Eastern' the symbol is. I was happy to listen to her memories as if they were to praise our artwork and 'Easternness'

Hand of Fatima, Jewish house, Mellah, Morocco

Hand of Fatima on a shop door in Cairo
By the way, it was accidentally smart enough to choose heavy paper for painting because mulberry juice (and original fingerpaint as well, I guess) would be too wet for regular paper. Well, after cleaning the mess we made, I searched for some recipes for home-made fingerpaints and here are three of them. The last one doesn't need any cooking and so super easy! 

Ingredients

1/2 cup cornstarch
3 Tbsp. sugar
1/2 tsp. salt
2 cups cold water
food coloring


Directions

In a medium pan, mix all the ingredients together to make the finger paint. Cook over low heat 10 to 15 minutes. Keep stirring the finger paint mixture until it is smooth and thick. After the finger paint has thickened take the pan off the stove and let the mixture cool.
After cooling, divide the finger paint into storage containers depending on how many colors you would like. Add a few drops of food coloring to each container. Stir the coloring in to the paint to determine the shade of color. You're ready to finger paint! Cover tightly when storing.


Cornstarch Fingerpaint


Ingredients

3 cups water
1 cup cornstarch
food coloring


Directions

In a medium saucepan, bring water to a boil.  Dissolve cornstarch in a separate bowl with water.   Remove boiling water from heat and add cornstarch mixture.  Return to heat, stirring constantly.  Boil until the mixture is clear and thick (about 1 minute).  Remove from heat.

As the mixture is cooling, divide into separate bowls and add food coloring.  Let the children carefully mix in the coloring.

Easy Fingerpaint


Ingredients

2 cups white flour
2 cups cold water
food coloring


Directions

Put water into a large bowl.  Slowly add the flour, while the children are stirring.  Once it's all mixed together, divide into smaller bowls and add food coloring.

Thursday, July 7, 2011

Mulberries

The mulberry fruit is not a berry but a collective fruit
 in appearance like a swollen loganberry.


My parents have been growing mulberry trees for a while, both black and white mulberries. Every summer the trees offer us large, juicy, white and purple-black fruits which fall from the trees as soon as they are fully ripe. Once again I'm feeling quite lucky now that Milou and I have this great opportunity to eat them as much as we'd like with all purple stained hands. Let me tell you that black mulberries are my favourite species: Large and juicy, with a good balance of sweetness an tartness which makes them the best flavoured ones for me. I knew that mulberries have been extensively grown for raising silkworms for centuries, but I didn't know they have also a long history in medicine particularly in China and almost all parts of these trees are used in one way or another. I've just learnt they've been used for liver-kidney deficiency, ringing ears, dizziness, insmomnia, rheumatic pain, premature gray hair and even diabetes. Fantastic!

Well, having grabbed this unique opportunity, it would have been a pity not to share a quick and easy dessert recipe using mulberries. Below is the recipe of  super easy milk pudding accompanied by black mulberry sauce. Everyone in the house liked it well. Give it a try and enjoy it!

Super easy milk pudding with mulberry sauce
Mulberry Sauce

Ingredients
2 cups ripe fresh mulberries
1/2 cup sugar
1/2 cup water

You don't need much sugar as the berries have such a natural sweetness to them, so you can even avoid using sugar in this recipe at all. Strain through a sieve and reserve in a container for future use.

Method
1. In a medium saucepan heat the water and sugar until all the sugar is dissolved, bring to boil. 
2. When the sugar solution is boiling add the mulberries. 
3. Boil for another minute or two till it becomes slightly thick and take it off the heat and let it cool.

Easy Milk Pudding


Ingredients

1 litre milk
1 cup flour
1-1.5 cups granulated sugar
2 tablespoons butter
1 tablespoon vanilla extract

Method

1. Whisk well all the ingredients (except the vailin extract) in a pan. Stir fast constantly to prevent the mixture from getting lumpy. Keep stirring till the mixture boils. 
2. Boil for another minute or two until the mixture thickens. Add the vanilin extract, stir once more and remove from heat. If there are still lumps in the pudding in the end, stir with an electrical mixer for a few minutes until it becomes smooth. 
3. Pour the pudding into serving cups and let it cool down. Refrigerate after 1-2 hours. Serve cold.

Sunday, July 3, 2011

Welcome to Istanbul: Chocolate Cake with Chocolate Sauce

Istanbul map by Emir Isovic

Great news! Milou, her super dad and I are finally in Istanbul all together for the summer holiday. We've already attended a wedding ceremony and met new people. Emir has been  travelling around the city and drawing everything that's enchanted and inspired him. The map above is one of them which has been posted as well on they draw and travel. Unfortunately, daddy has to return to Sarajevo in two weeks but we'll be around here for some more time! Well, here is the photograph of the chocolate cake with super duper chocolate sauce my sister made for Milou and me as a welcome home present! The texture and taste were beyond my imagination. I will add the recipe as soon as she shares it with me. I should leave now: There is a lot to see in Istanbul.  


Saturday, July 2, 2011

Swiss Chard Pie


It's summertime. It's time to enjoy every piece of green in the little garden at the backyard including parsley, lettuce, cucumbers and Swiss chard. It's time to bake a pie every other day to enjoy the summertime. It's time to learn how to roll out traditional yufka/phyllo with a rolling pin. I proved to be quite successful with the first few sheets which encouraged me to go on with growing eagerness.  I'm not an expert in the field but they say as you get familiar over time with the texture and rolling process, you can roll out even thinner and thinner yufka/phylloHere are the recipe I came up with and the photographs. Give it a try. You won't regret it!


Ingredients


(for the filling)
1 bunch of Swiss chard
4 tablespoons of vegetable oil
2 medium onions, peeled and chopped
3-4 cloves of garlic
1,5 glasses of warm milk
salt and black pepper


(for the yufka)
3-4 cups flour
warm water 
2 teaspoons of white vinegar
1 teaspoon of salt
1 teaspoon of sugar
3 tablespoons of olive oil


To glaze
1 large egg yolk beaten


Method


Step 1:
  1. De-rib the chard, wash well, and let the chard drain on a kitchen towel (or some paper towels) for a few minutes, so that there’s no excess water on the leaves. Coarsely chop the chard, and set aside. 
  2. Heat vegetable oil in a saucepan. Add the onion and garlic and saute for a few minutes. Add the chard, mix everything together and cook for five minutes, stirring, until almost tender. Add some salt and pepper. Remove from heat and set aside. 
Step 2:
  1. Add 3-4 cups of flour to a large bowl. Make a well in the centre and add warm water (start with 3/4 cup), 2 teaspoons of white vinegar, 1 teaspoon of salt and 3 tablespoons of olive oil. Mix them all together until you get a soft dough. Feel free to add more water if needed. 
  2. Turn the dough out onto a floured surface and knead by hand, oiling hands if needed, until the dough is soft and smooth for 10 minutes. 
  3. Divide the dough into 10 equal pieces and roll each piece with a rolling pin out to an oval shape yufka/phyllo, about 24 cm across and almost 2 sheets of copy paper thick, sprinkling the work surface and the yufka/phyllo with flour to keep from sticking.
Step 3:
  1. Place a layer of yufka/phyllo in a lightly greased ovenproof dish and spread some chard mixture over the yufka/phylloRepeat layering until all of the chard mixture, and yufka/phyllo have been used up. Do remember to pour some milk on the layers while assembling the pie which definitely helps the pie become juicy. Use remaining yufka/phyllo sheets to cut into strips. Arrange the strips to fit the top of the pie. Brush the strips with the blaze and bake for around 30 minutes or until the top is golden.